iBooks にある “The Swift Programming Language” の勉強メモ。Objective-C と C を普段書いている自分から、ちょっと馴染みがないものを特にまとめておきます。目次は こちら。
今回は、Collection Types の章の if のような Controll Flow に関して。
Control Flow
1. for-in での _ (underscore)
Array や Dictionary, range operator 等でよく使用する for-in において、その範囲に各要素自体を使用する必要がない場合には、_ を使用できます。下記の例は、3^10 を計算しています。
1 2 3 4 5 6 7 8 | let base = 3 let power = 10 var answer = 1 for _ in 1...power { answer *= base } println("\(base) to the power of \(power) is \(answer)") // prints "3 to the power of 10 is 59049 |
2. switch 文
Swift の switch
C と Swift の swtich はちょっと違います。この母音か子音か、それ以外かを区別する switch は、
1 2 3 4 5 6 7 8 9 10 11 12 13 14 | let someCharacter: Character = "e" switch someCharacter { case "a", "e", "i", "o", "u": println("\(someCharacter) is a vowel") case "b", "c", "d", "f", "g", "h", "j", "k", "l", "m", "n", "p", "q", "r", "s", "t", "v", "w", "x", "y", "z": println("\(someCharacter) is a consonant") default: println("\(someCharacter) is not a vowel or a consonant") } /* Output: e is a vowel */ |
まずは、break を各ケースに置く必要がありません。また、C 言語で問題とされていた、デフォルトでの、fall through が変わりました。。一つのケースに該当したら、それ以降のコードは実行されません。また、ケースに条件に対して、カンマで区切って場合分けすることができます。最後に、switch 文はあらゆる値がきても、どれかのケースに該当しなければいけません(exhaustive)。この場合には、default ケースは必須です。ないと、コンパイル時に怒られます。
ケースの範囲指定
range operator を使用して、switch 文の場合分けをすることができます。
1 2 3 4 5 6 7 8 9 10 11 12 13 14 15 16 17 18 19 20 21 22 | let someCharacter: Character = "e" let count = 3_000_000_000_000 let countedThings = "stars in the Milky Way" var naturalCount: String switch count { case 0: naturalCount = "no" case 1...3: naturalCount = "a few" case 4...9: naturalCount = "several" case 10...99: naturalCount = "tens of" case 100...999: naturalCount = "hundreds of" case 1000...999_999: naturalCount = "thousands of" default: naturalCount = "millions and millions of" } println("There are \(naturalCount) \(countedThings).") // prints "There are millions and millions of stars in the Milky Way. |
tupleでのケースの指定
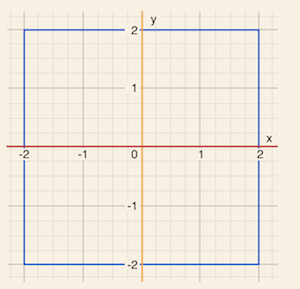
switch 文の場合分けを tuple で、行うこともできます。_ は、何に対してもマッチするという意味です。下記の Apple による例では、座標軸がどこに対応しているかをチェックしています。まずは、原点をチェックし、そして、x軸, y軸, 青い box の中、それ以外という順にチェックしています。一つのケースが該当されると、それ以外は無視されます。
1 2 3 4 5 6 7 8 9 10 11 12 13 14 | let somePoint = (1, 1) switch somePoint { case (0, 0): println("(0, 0) is at the origin") case (_, 0): println("(\(somePoint.0), 0) is on the x-axis") case (0, _): println("(0, \(somePoint.1)) is on the y-axis") case (-2...2, -2...2): println("(\(somePoint.0), \(somePoint.1)) is inside the box") default: println("(\(somePoint.0), \(somePoint.1)) is outside of the box") } // prints "(1, 1) is inside the box |
Value Binding
各ケースの実行コードの中で使用できるようにコンスタントか変数を binding することができます。まずは、このコードを見てください。
1 2 3 4 5 6 7 8 9 10 | let anotherPoint = (2, 0) switch anotherPoint { case (let x, 0): println("on the x-axis with an x value of \(x)") case (0, let y): println("on the y-axis with a y value of \(y)") case let (x, y): println("somewhere else at (\(x), \(y))") } // prints "on the x-axis with an x value of 2 |
ケースの条件にある、let x は、一つ目の tuple の要素は何に対しても対応し、二つ目の要素は 0 のケースと読めます。最後の let(x, y)は、何に対してもマッチします。この場合には、全てのパターンを捉えているので、default は必要ありません。exhaustive であればよいのです。
where clause
switch ケースに where を追加して、余分に条件を指定することができます。
1 2 3 4 5 6 7 8 9 10 | let yetAnotherPoint = (1, -1) switch yetAnotherPoint { case let (x, y) where x == y: println("(\(x), \(y)) is on the line x == y") case let (x, y) where x == -y: println("(\(x), \(y)) is on the line x == -y") case let (x, y): println("(\(x), \(y)) is just some arbitrary point") } // prints "(1, -1) is on the line x == -y |
この場合も 最後の let(x,y) のおかげで、default が必要ありません。
fallthrough キーワード
上記で見たように、Swift の switch は、C のように fall through しない。もし、C と同じ挙動をして欲しい時には、fallthrough を使用する。
1 2 3 4 5 6 7 8 9 10 11 | let integerToDescribe = 5 var description = "The number \(integerToDescribe) is" switch integerToDescribe { case 2, 3, 5, 7, 11, 13, 17, 19: description += " a prime number, and also" fallthrough default: description += " an integer." } println(description) // prints "The number 5 is a prime number, and also an integer. |
このような fall through を意図したケースというのは 3% もないらしいです。なので、変えたのでしょうね。C と同じように、fallthrough した後は、ケースの条件はチェックしません。
3. Labeled statement
もちろん、ループや swtich をネストすることができます。また、その中で break 等も使用できます。このような時に、ステートメントにラベル付けをして、どのようにプログラムのフローを変える処理をするのかことを明らかにしておくとコードが読みやすくなりそうです。
そのために、ループ、switch に対してラベル付けする方法があります。ラベルの名前に続いて : をタイプして、ループか switch の前に置くだけです。そして、break の後にラベルの名前を書くことにより、そのループか switch を終わらせます。また、continu の後に、ラベルの名前を書くことにより、その場所へジャンプします。
1 2 3 4 5 6 7 8 9 10 11 12 13 14 15 16 | gameLoop: while square != finalSquare { if ++diceRoll == 7 { diceRoll = 1 } switch square + diceRoll { case finalSquare: // diceRoll will move us to the final square, so the game is over break gameLoop case let newSquare where newSquare > finalSquare: // diceRoll will move us beyond the final square, so roll again continue gameLoop default: // this is a valid move, so find out its effect square += diceRoll square += board[square] } } println("Game over!") |
このコードの注意点として、break に対してラベルを指定することで、while を抜けるということです。もし、break にラベルを指定しなかった場合には、switch を終了し、while ループは継続してしまいます。また、ここでは、continue に対して、ラベルを指定する必要はありませんが、これにより多少コードが読みやすくなるという利点があります。